How to Coordinate HVAC Installation in New Construction
How to Coordinate HVAC Installation in New Construction
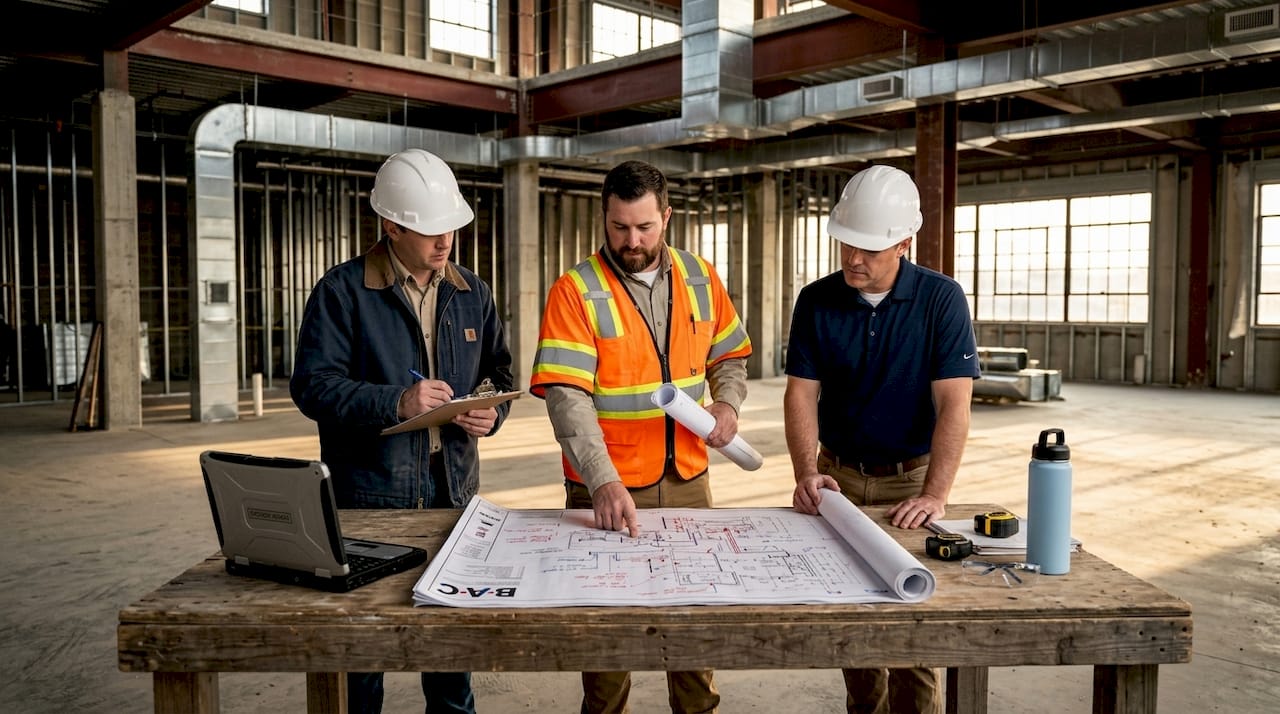
Every general contractor knows the feeling: you’re two weeks from rough-in, the framing crew just finished, and you get a call that the HVAC installer needs ceiling space that the electrical conduit already claimed. To properly coordinate HVAC installation in new construction, you need a structured plan that starts well before the first piece of ductwork goes up. In the industry, this process falls under mechanical coordination, a discipline covering phased scheduling, multi-trade clash prevention, documentation management, and commissioning verification. This guide covers all three phases, preparation, execution, and final verification, so your mechanical scope closes on time and without expensive rework.
Table of Contents
- Key takeaways
- How to coordinate HVAC installation in new construction: prerequisites
- Executing the installation alongside other trades
- TAB reports and duct leakage verification
- Refrigerant piping: installation and pressure testing
- What I’ve learned about documentation and coordination
- Brighton Air Corp: your HVAC coordination partner
- FAQ
Key takeaways
| Point | Details |
|---|---|
| Start coordination early | Involve HVAC contractors in design meetings before construction begins to prevent costly trade conflicts. |
| Own the documentation | TAB reports, commissioning records, and factory start-up paperwork protect warranties and satisfy occupancy requirements. |
| Sequence rough-ins carefully | Schedule HVAC rough-in alongside electrical and plumbing to catch space conflicts before they become change orders. |
| Specify leakage classes precisely | Vague duct specs let installers skip testing entirely, leading to energy loss and comfort failures. |
| Know the 2026 refrigerant rules | R-410A phase-out timelines affect equipment procurement decisions you need to make today. |
How to coordinate HVAC installation in new construction: prerequisites
Before any equipment shows up on site, your coordination work should already be weeks deep. The single biggest driver of HVAC delays in new builds is a design that was never reconciled against the real spatial constraints of the structure. Getting this right means pulling the mechanical contractor into design-phase meetings, not just handing them drawings after the permit is issued.
Start with these critical prerequisites:
- Design coordination with the architect and MEP engineer. Walk the mechanical drawings against structural and ceiling plans. Flag any duct runs that compete with beams, electrical panels, or plumbing chases before those conflicts get built into the structure.
- Equipment specification and capacity verification. Confirm that the specified equipment matches the Manual J or commercial load calculation. A unit that is slightly undersized because the building envelope changed late in design will create comfort complaints from day one.
- Refrigerant compliance review. The R-410A phase-out aims for 15% of current output by 2036, with some states enforcing earlier deadlines. Verify that equipment specified today won’t create a procurement gap six months from now, and confirm local regulations with your supplier.
- Scope of work documentation. Define in writing which subcontractor owns each interface point: electrical disconnects, roof curbs, condensate routing, and gas piping terminations. Ambiguity at these handoff points is where disputes and delays are born.
- Commissioning deliverables list. For VRF or VRV systems, factory-authorized start-up documentation is not optional. Missing this voids most manufacturer warranties, and that liability falls on whoever let it slip through scope.
Pro Tip: Create a single coordination matrix spreadsheet shared across all trades listing each interface point, who is responsible, and what documentation is required at closeout. This one document prevents more disputes than any meeting ever will.
Coordination meetings should happen at framing, before rough-in, before insulation, and before drywall. Each meeting should review the sequence for the next two weeks, not just recap what already happened.
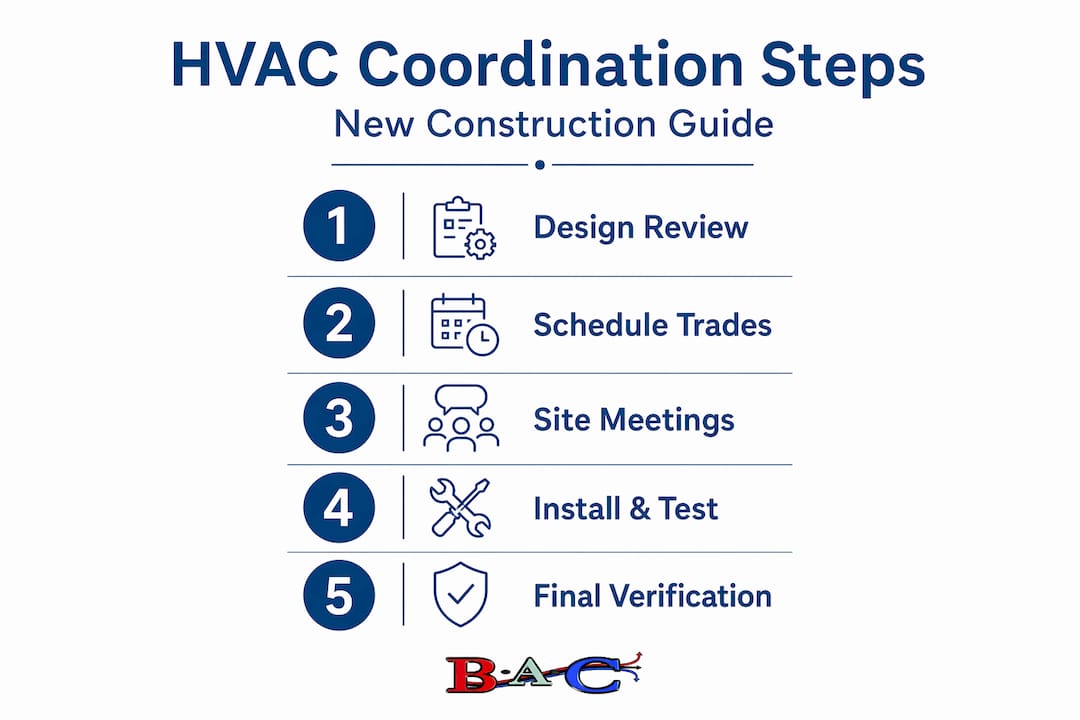
Executing the installation alongside other trades
With prerequisites locked in, the execution phase is where coordination theory meets job site reality. The sequence matters more than most general contractors realize, and getting it wrong costs you real money in rework.
Follow this installation sequence to stay ahead of conflicts:
-
Set roof curbs and structural supports first. Rooftop unit placement, structural penetrations, and crane logistics need to be confirmed with the roofing contractor before the roof membrane goes down. A rooftop unit landed on an incorrectly positioned curb means cutting into a finished roof, which is both expensive and a waterproofing liability.
-
Run ductwork trunk lines during framing. Main duct runs through mechanical chases and above major ceiling areas should go in while the space is still open. BIM-style clash detection between HVAC and other trades reduces delays and costly modifications, but on projects where full BIM isn’t used, a field coordination walk with the electrician and plumber accomplishes much of the same thing.
-
Schedule rough-ins to overlap, not stack. HVAC, electrical, and plumbing rough-ins should run concurrently in different zones rather than sequentially in the same zone. This compresses the schedule significantly. Assign each trade a starting zone and a clear direction of travel through the building so they don’t collide.
-
Complete refrigerant piping before insulation. Refrigerant lines must be pressure tested before any insulation covers them. Once the lines are insulated, any leak becomes nearly impossible to locate without tearing the system apart.
-
Coordinate factory-authorized start-up as a scheduled milestone. For VRF systems specifically, factory start-up reports and refrigerant charge records must be specified closeout deliverables. Schedule the manufacturer’s representative the same way you schedule an inspection, with advance notice and a confirmed ready date.
-
Document the formal handoff between trades. When the HVAC rough-in is complete and the system is ready for the next trade to proceed, get a written sign-off. This is not bureaucracy. It is the record that protects everyone when a dispute arises about who damaged what.
Pro Tip: Build two extra days into the schedule between the completion of HVAC rough-in and the start of insulation. That buffer is almost always consumed by pressure testing, minor rework, or waiting for the inspector. When it isn’t needed, your project is ahead of schedule.
TAB reports and duct leakage verification
Testing, adjusting, and balancing, commonly called TAB, is the verification step that confirms your HVAC system actually performs the way it was designed. It is also one of the most commonly mismanaged parts of HVAC coordination on new construction.
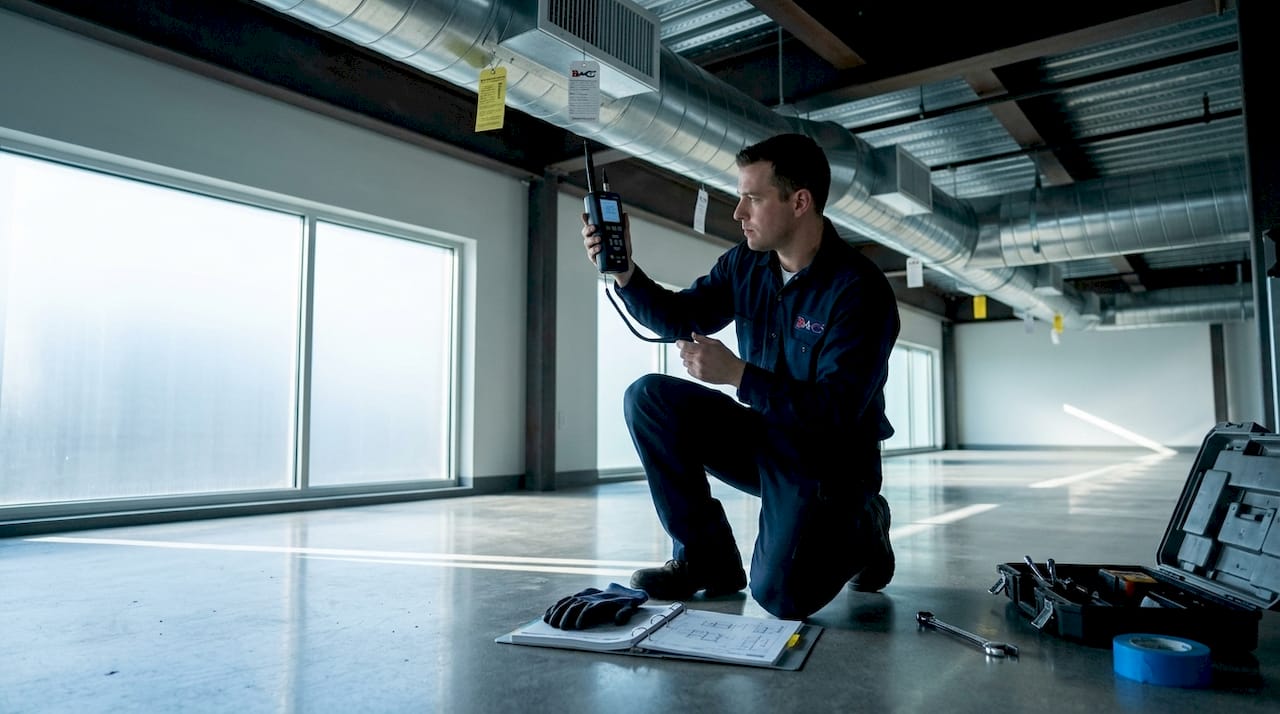
A proper TAB report documents airflow at every diffuser or terminal against the design value, with a tolerance of plus or minus 10% being typical. TAB reports with design-vs-actual airflow per diffuser are a critical occupancy prerequisite and commissioning deliverable. Specify an independent, certified TAB provider rather than relying on the installing contractor to self-certify. The conflict of interest is obvious, and the data is far more defensible when a neutral party produces it.
Duct leakage testing is a separate but related process, and most specifications get it wrong. Here is where builders consistently make costly mistakes:
- Misunderstanding the leakage metric. Leakage is measured in cubic feet per minute (cfm) per 100 square feet of duct surface area at a defined pressure. SMACNA leakage classes define allowable rates precisely. Specifying a “percent leakage” figure is technically meaningless under SMACNA standards and creates ambiguity that lets installers avoid testing altogether.
- Skipping leakage class and pressure class designation. Vague duct leakage specs effectively waive any implied obligation to test, leading to comfort issues and energy waste after occupancy. Your spec sheet must name both the leakage class and the pressure class.
- Incorrect flange connection for the pressure class. The TDC flange system is recommended for duct systems above 1 inch static pressure. At lower-pressure applications, gasket continuity at every joint is non-negotiable. A half-inch gap in a gasket creates a measurable leak even if the spec technically allows a looser fit.
| Leakage class | Allowed leakage (cfm/100 ft²) | Typical application |
|---|---|---|
| Class 3 | 3 cfm at 1" static pressure | Low-pressure residential systems |
| Class 6 | 6 cfm at 1" static pressure | Standard commercial systems |
| Class 12 | 12 cfm at 1" static pressure | Older or low-spec commercial builds |
| Class 48 | 48 cfm at 1" static pressure | Industrial applications, rarely specified |
Get the TAB report before you schedule the occupancy inspection. Inspectors increasingly ask for it, and owners who receive a complete commissioning package have far fewer post-occupancy complaints.
Refrigerant piping: installation and pressure testing
Refrigerant piping is one of the most procedurally rigid parts of HVAC system setup in new builds. The steps are non-negotiable, and shortcuts here create failures that are expensive to diagnose and repair after the walls are closed.
Follow this sequence on every project:
-
Minimize joints and plan for thermal expansion. Every joint in a refrigerant line is a potential leak point. Route lines to use the fewest possible fittings, and account for expansion loops on long runs. Copper lines moving through temperature cycles will work loose at unsupported joints over time.
-
Pressure test with dry nitrogen only. Never use refrigerant for leak testing. Strength and leak testing requires dry nitrogen, a 24-hour hold test, and witness documentation performed before insulation installation.
-
Do not make repairs while the system is pressurized. This is a safety rule, not just a best practice. Depressurize, make the repair, and restart the test sequence from the beginning. Skipping the full hold after a repair means the integrity of the entire system is unverified.
-
Record and witness the test results. The person who witnesses the pressure test signs the record. That documentation goes into the project closeout package. If a warranty dispute arises two years later, this record is your evidence.
-
Apply insulation and labeling after testing. Insulate refrigerant lines per manufacturer specifications, and label line sets at each end and at any penetration. With the 2026 refrigerant regulations affecting equipment selection, accurate labeling of refrigerant type on existing and new systems has also become a compliance detail worth tracking.
What I’ve learned about documentation and coordination
I’ve seen projects fall apart in the final two weeks because the physical installation was perfect and the paperwork was a disaster. The factory commissioning report for the VRF system never got requested. The TAB provider finished their work but never submitted a formal report to the general contractor. The duct leakage test was done verbally, with no written record.
In my experience, the contractors who close out HVAC scopes cleanly are not necessarily the ones with the best field crews. They are the ones who treat documentation ownership as a first-class project management responsibility, not an afterthought. They assign a specific person to collect each deliverable, and they check that list weekly from rough-in through commissioning.
The other thing I’d push back on is the assumption that BIM is only for large commercial projects. Even a lightweight digital clash detection workflow on a mid-size residential build can catch ceiling space conflicts before they become field change orders. The cost of the software is trivial compared to one rerouted duct trunk.
My honest advice: spend an extra two hours on your pre-construction coordination meeting and you’ll recover four times that in avoided delays. The mechanical trades want clarity. Give it to them in writing, in advance, and they will perform.
— John
Brighton Air Corp: your HVAC coordination partner
When you’re managing a new construction project in New Jersey, HVAC coordination is one scope where having an experienced partner matters from day one.

Brighton Air Corp has been delivering expert HVAC installation services to builders and contractors since 1993, with over 150 years of combined technician experience across residential and commercial new construction. From equipment specification and multi-trade scheduling to factory-authorized commissioning and TAB documentation, Brighton Air Corp manages every phase of HVAC project coordination so your closeout package is complete and your warranties are protected. If you’re planning a new build and want a mechanical partner who shows up prepared, get a free estimate from Brighton Air Corp today.
FAQ
What does it mean to coordinate HVAC installation in new construction?
Mechanical coordination in new construction means scheduling and integrating the HVAC scope with structural, electrical, plumbing, and roofing trades to prevent conflicts, avoid delays, and produce a complete documentation package at closeout.
When should HVAC coordination begin on a new build?
HVAC coordination should begin during the design phase, before permits are issued. Early involvement allows the mechanical contractor to flag spatial conflicts and verify equipment selections before construction locks in building dimensions.
Why are TAB reports required for new construction HVAC?
TAB reports document terminal-level airflow balance against design targets and serve as occupancy prerequisites and commissioning deliverables. They also protect against post-occupancy comfort disputes and support warranty claims.
How does the 2026 R-410A phase-out affect new construction projects?
The R-410A phase-out requires builders to verify that equipment specified today aligns with current and near-term refrigerant availability. Some states enforce earlier deadlines than the federal rule, so local compliance checks are necessary.
What is the correct way to specify duct leakage testing?
Specifications must name both a SMACNA leakage class and a duct pressure class. Without both, installers have no clear testing obligation, and the result is unverified leakage that drives up energy costs and reduces comfort after occupancy.
Recommended
- Cranford Westfield Summit Scotch Plns Fanwood Kenilworth Clark Rahway Livingston AC Repair Install Service HVAC Contractor Emergency Heat Pump Repair HVAC System Installation
- Cranford Westfield Summit Scotch Plns Fanwood Kenilworth Clark Rahway Livingston AC Repair Install Service HVAC Contractor Emergency Heat Pump Repair HVAC System Installation
- Cranford Westfield Summit Scotch Plns Fanwood Kenilworth Clark Rahway Livingston AC Repair Install Service HVAC Contractor Emergency Heat Pump Repair HVAC System Installation
- Cranford Westfield Summit Scotch Plns Fanwood Kenilworth Clark Rahway Livingston AC Repair Install Service HVAC Contractor Emergency Heat Pump Repair HVAC System Installation